Thursday 9 January 2014

Hidden useful feature in Android 4.3

Don’t understand why your app for reading eBooks needs permission to your phone logs or why your restaurant menu app keeps using GPS to determine your location while draining your battery?
Up until now the easiest thing to do was to uninstall (or not install) that app.
But Android Police found a hidden feature in Android 4.3 that allows you to disable some permissions for apps on a per-app basis.
Android 4.3 app ops
It’s called App Ops, and it’s apparently not ready for prime time yet, so Google has sort of hidden it away in Android 4.3. It’ll probably be easier to access in future updates. But there’s an unofficialPermission Manager app that makes it easy to access the new settings. It should work on any device running Android 4.3.
Not only does App Ops let you turn off permissions for apps, deciding that Google Search, for instance, can’t access your location. But it’ll also tell you when the last time was that you actually used that feature — so you might be able to get a sense of how often you’re currently using a permission. That could help decide if you really want to disable it.
This is a pre-release feature, so while you can play with it now you might want to make a note of your existing settings and proceed with caution. There’s a chance you could break something and cause some apps to stop functioning properly

How to backup on android to PC

SyncDroid is a Android sync manager works on Windows PC desktop. Keeping SMS, Contacts, Call Logs, Bookmarks, Audio, Videos, Camera Photos and SD Card Photos in sync between your android phone and your computer, through USB connection directly. Supports almost any Android devices, like Samsung Galaxy S4, Galaxy S3, Galaxy S2, Galaxy Note / Note2, Motorola Droid, RAZR, Sony Ericsson Xperia, LG Optimus and many other devices.
Learn how to backup and restore data from Android by referring to SyncDroid User Guide shown as below.

Step 1: Turn on Android USB Debugging

Before connecting your Android Phone to the PC, please make sure the [USB debugging] option has been turned on. The steps of turning on the [USB debugging] option may various from different devices.

On Android 2.X & Android 3.X:
On most devices running Android 2.x or 3.x, you can find the option under Settings > Applications > Development.
USB Debugging on Android 2/3
On Android 4.0 & Android 4.1:
On Android 4.0 and Android 4.1, it's in Settings > Application manager >Developer options.
USB Debugging on Android 4
On Android 4.2+:
If you have recently upgraded your device to Android 4.2 Jelly Bean or have bought a new device with 4.2 or higher pre-installed, please follow the steps to enable Developer Options and turn on USB Debugging.

1. Open "strong>Settings" > About on your Android phone or tablet.
2. Go to”Build Number”.
3. Tap on “Build Number” for 7 Times to go to developer options.
After tapping the Build Number 7 times, you will see a message “You are now a developer!” or “Developer mode has been enabled”.
USB Debugging on Android 4
4. Go back to ”Settings”, you should see Developer Option apperead in the settings list.
5. Tap on Developer options and mark the box in front of "USB Debugging" to enable it.
6. To disable Developer Options and USB Debugging mode later, follow the same steps and uncheck the box in front of USB Debugging.

Step 2: Connect Android Phone to SyncDroid on PC

After you connected your phone to the PC, Android-Sync connection manager will try to help you install the proper USB driver for your Android devices. And SyncDroid service will be installed on to your android phone automatically.
You may need to click on the [OK] button from the Android device to allow the Android device to connect to the PC.
Connect Android to PC

Step 3: Ready for Backup & Restore

Backup or restore any or all of these data types: SMS, Contacts, Call Logs, Bookmarks, Audio, Videos, Camera Photos and SD Card Photos. Please don't unplug USB cable while backing up or restoring.
How to back up your Android Phone:
Backup Android Phone
1. Choose items you would like to backup from: SMS, Contacts, Call Logs, Bookmark, Audio, Video and Photos.
2. Input backup name and note to specify the backup file for restoring data in future.
3. Click "Backup" button.
How to restore your Android Phone:
Restore Android Phone
1. Select one backup package to restore from your computer.
2. Select category you would like to restore from: SMS, Contacts, Call Logs, Bookmark, Audio, Video and Photos.
3. Choose to overwrite files of the same name or not.
4. Click "Restore" button.

How to Enable Developer Options/USB Debugging Mode on Devices with Android 4.2/4.3 Jelly Bean

Most of the time whenever you would like to flash or upgrade your Android device via flash tool or whenever you want to Root your android device you need to enable USB debugging mode in order to connect and communicate with your Android device. This mode not only useful for connectivity but helps in sending command code to your Android device via Odin. By default the USB debugging mode is disabled for any brand new device to avoid unintentional modifications on your device. But you need to enable debugging option manually for your Android development process. For different Android versions there will be different configurations to turn the USB debugging mode.

Features of Developer Options

The “Developer Options” feature is indispensable to Android developers, hackers and enthusiasts as a means to quickly access and control their device from the PC. Even if you are an average user and wish to root, install a ROM or mod on your Android device, you must turn on USB Debugging mode on your phone or tablet. And you’ll not be able to do it unless you enable Developer Options on your device first.
Among the most useful features that are  found under Developer Options are as follows:
  • Enable debugging over USB.
  • Quickly capture bug reports onto the device.
  • Show CPU usage on screen.
  • Draw debugging information on screen such as layout bounds, updates on GPU views and hardware layers, and other information.
  • Many other options to simulate app stresses or enable debugging options.
The “Developer Options” has always been visible by default in all previous versions of Android. On
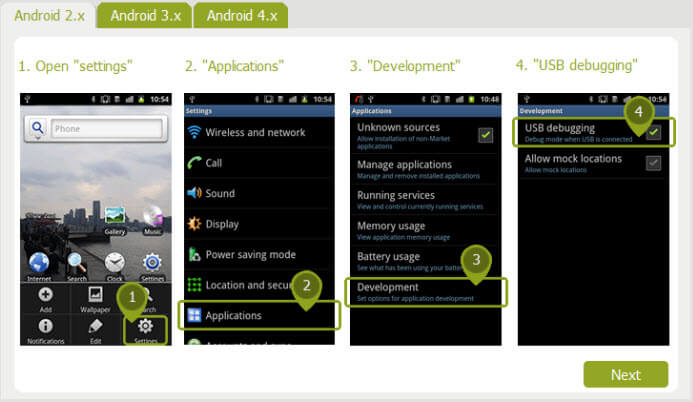
Developer Options on Gingerbread (Android 2.3):
Settings> Applications> Development> USB Debugging
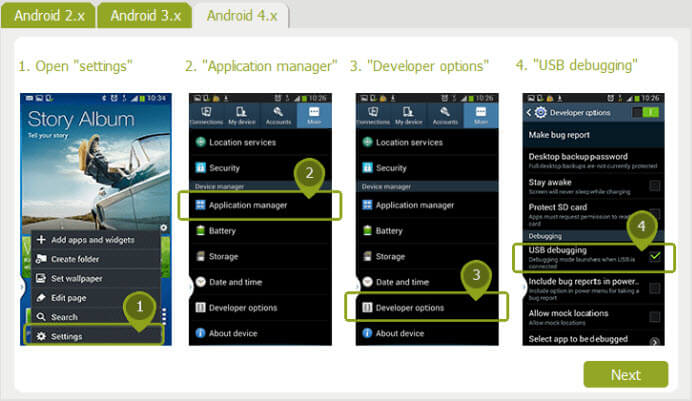
Developer Options on ICS (Android 4.0):
Settings> Developer Options> USB Debugging
Developer Options on JB (Android 4.1):
Settings> Developer Options> USB Debugging
If you have recently upgraded your device to Android 4.2 Jelly Bean or have bought a new device with 4.2 or higher pre-installed, do not be surprised if you find the  ”Developer Options” missing.

How to Enable Developers Options on Android 4.2

In fact, the developer options lie at the core of Android development and so they cannot be removed as long as Android is an open source environment. The only change Android 4.2 brings in connection to these useful options is that now they are hidden by default  and you will have to make it available by doing some finger exercise.
  1. Open Settings> About on your Android phone or tablet.
  2. If you have a Samsung Galaxy S4, Note 8.0, Tab 3  or any other Galaxy device with Android 4.2, open Settings> More tab> About and tap it.
  3. If you have Galaxy Note 3 or any Galaxy device with Android 4.3, go to Galaxy Note 3 from Settings> General> About and tap the Build version 7 times.
  4. Now scroll to Build number and tap it 7  times.
  5. After tapping the Build Number 7 times, you will see a message “You are now a developer!” If you have a Galaxy S4 or any other Samsung Galaxy device with Android 4.2, the message reads as follows- “Developer mode has been enabled”.
  6. Return to the main Settings menu and now you’ll be able to see Developer Options.
  7. Tap on Developer options and mark the box in front of  USB Debugging  to enable it.
  8. To disable USB Debugging mode later, you can uncheck the box before the option
  9. To enable Developer Options, go to Settings> Developer options and tap on the ON/OFF slider on the top of the page.

Enable USB Debugging on HTC One:

If you own a HTC One or any other HTC phone with Android 4.2.2 Jelly Bean, here is how you can turn on the Developer Options on your device:
  1. Open Settings> About> Software Information> More.
  2. Then tap “Build number” seven times to enable Developer options. Finally you will see “You are now a developer!” message on the screen.
  3. Go back to Settings menu and now you’ll be able to see “Developer options” there.
  4. Tap it and turn on USB Debugging from the menu on the next screen.
It is not obvious why Google decided to hide the “Developer options” on the latest version of Android. I guess they might have done it as a warning for noobs but whatever the reason might be, you can easily turn on the Developer Options and enable USB Debugging mode in a fun way using the above method.

Hiding Developer Options on Android:

Once activated, the Developer Options on devices with Android 4.2/4.3 or above remain visible. You will not find a single option that lets you revert back to the state when it was hidden. However, there is still a way to hide Developer Options on Android device. To do this, you will have to boot your device into Recovery Mode and perform a “data/factory reset”.

Tuesday 7 January 2014

Resetting BIOS password in WINDOWS

Question: When I start up the computer, it asks the start up
password? How to remove the Windows startup password?
The OS is Windows XP.
Startup password? Is it the BIOS password or Windows login
password? Does it ask for a password when you FIRST start
it on, like before Windows loads or after?
If it appears before Windows loads, it should be the BIOS
password. The BIOS is often used to describe a software
that is programmed into a ROM, that runs every time you
boot up a computer. And a BIOS password refers to a
password set on the Bios or security chip. It appears before
the operating system loads, usually on a black screen a few
seconds after the laptop is started.
If so, you can simply remove the BIOS password as this will
act to wipe clean all of the memory and settings in BIOS,
including the stored password. Then put it back after
15-30 minutes and the data contained into the BIOS
memory should be volatilized. If you are not good at
computer, it’s not advised to do it by yourself. Instead, you
can ask for help from a computer expert or your computer
manufacture.
If the startup password appears after Windows loads, it
should be your Windows login password. For this, you can
simply log on to another user account with admin privileges
with its password, and then reset the password for your
target user account by using following steps.
1. Go to Start button and click Run box.
2. Enter “lusrmgr.msc” in the Run box and click OK.
3. Expand the Users folder on the coming Local Users and
Groups window. You’ll see all the user accounts on the
computer.
4. Right-click your target user account and select Reset
password.
5. Enter a new password twice for the target account.
That’s all. Done! If you don’t have another admin account
available on the logon screen, you can have a try of the
default administrator account. It’s well known that the
built-in administrator in Windows XP is enabled and not
password protected by default. Press Ctrl+Alt+Del twice on
the Windows logon screen to bring up the classic log-on box,
type “administrator” in the username box and then press
Enter to try to get into the administrator account. If you
never set a password for this account, you’ll be able to get
into Windows. Next you can follow the directions listed above
to reset the lost Windows XP password. If failing to get into
Windows, you can resort to other methods, like third-party
Windows password reset applications.
Windows Password Breaker Professional is professionally
designed to reset forgotten login passwords for Windows 7/
Vista/XP and Window server 2008(R2)/2003(R3)/2000.
With this powerful application, you can burn a bootable
password reset disk with a CD/DVD or USB flash drive in
seconds in any PC. Then you can boot the computer you
want to reset password for from the bootable disk. After
that, you’ll be able to reset the forgotten Windows password
to blank in a minute.
The whole Windows password reset process will cost you a
few minutes, no matter how long and complicated your lost
password is. 100% secure guaranteed. No any data loss or
damage. No computer skills required. Video Guide and
step-by-step tutorial are available on its official website