Thursday, 26 December 2013

Update Samsung Galaxy MEGA to Android 4.4 KitKat with CM11 Custom ROM

CUSTOM ROM INFO
NameCyanogenMod 11 aka CM11 unofficial build
Android UpdateAndroid 4.4.2 KitKat (Launched on Dec 9 by Google)
Is this official?No. Official update from Samsung is expected to release in Feb-March 2014
StabilityGood enough for daily use
CreditsSilesh.Nair
Let’s see how to install the Android 4.4 KitKat on your Samsung Galaxy MEGA GT-I9200/GT-I9205.

WARNING!

Warranty may be void of your device if you follow the procedures given on this page.
You only are responsible for your device. We won’t be liable if any damage occurs to your device and/or its components.

CHECK DEVICE MODEL NO.

To make sure your device is eligible with this, you must first confirm its model no. in ‘About device’ option under Settings. Another way to confirm model no. is by looking for it on the packaging box of your device. It must be GT-I9200/GT-I9205!
Do not use the procedures discussed here on any other Galaxy MEGA (including the MEGA devices at Sprint, Verizon, T-Mobile and AT&T) or any other device of Samsung or any other company. You have been warned!

BEFORE YOU BEGIN..

You must do this pre-installation stuff before attempting to install the ROM on your Samsung Galaxy MEGA in order to avoid any complications later, and have a smooth and successful process.
GET THE LATEST CWM/TWRP RECOVERY
Make sure that you’ve latest version of the recovery of your choice installed on your device.
Older versions of both CWM and TWRP recoveries are not working with Android 4.4 based ROMs, throwing installation errors and WiFi bugs, therefore you need to use the latest version of either recovery. We believe TWRP v2.6.3.0 and above, and CWM v6.0.4.3 and above are working fine with Android 4.4 ROMs.
BACK UP YOUR DEVICE
Back up important data and stuff before you start playing around here as there are chances you might lose your apps and app-data (app settings, game progress, etc.), and in rare case, files on the internal memory, too.
For help on Backup and Restore, check out our exclusive page on that linked right below.
CHARGE YOUR DEVICE
If your android device powers off due to lack of battery while the process is underway, it could damage the device.

So, make sure your device is adequately charged — at least 50% battery of the device.

DOWNLOADS

Download the files given below and transfer them to a separate folder on your phone and remember the location.
GAPPS FILE
Download Link | File name: 12-14_GApps_Standard_4.4.2_signed.zip (75.5 MB)
ROM FILE
Download Link  | File name: cm-11-20131216-UNOFFICIAL-meliusltexx.zip (194.9 MB)
For latest version of the ROM, check the original page →.
Reminder: Before you proceed, make sure you’ve transferred the files you downloaded above to a separate folder on your Samsung Galaxy MEGA GT-I9200/GT-I9205.

STEP-BY-STEP GUIDE

Reminder: Make sure you’ve installed latest version of the recovery of your choice and have backed up your device adequately (including important data stored on internal memory) as mentioned in ‘Before you begin‘ section above.
GUIDE FOR CWM RECOVERY USERS
  1. Boot into recovery mode. For this:
    • Power off your device and wait for 5-10 seconds until the device is fully switched off.
    • Press and hold  Volume Up + Home + Power buttons together and release them as soon as you see the Galaxy MEGA logo.
      └ In Recovery mode, use Volume buttons to navigate Up and Down between options and use Power button to select an option.
      For more options to boot into recovery mode, check our Galaxy Mega Recovery Mode page.
  2. Create a Nandroid Backup from recovery. It’s optional but very important to do, so that in case something goes wrong you can restore to current status easily. For making a Nandroid Backup, go to Backup And Restore » Backup.
  3. Perform a Factory Reset (This will delete all apps and their settings and game progress). For this:
    • Select Wipe data/Factory reset, then select Yes on the next screen to confirm factory reset (screenshot)
  4. Also perform a System Format, Go to ‘Mounts and storage‘, select ‘format /system‘, then selectYes on the next screen to confirm system format
  5. First Install the ROM file:
    • Select Install zip » Choose zip from sdcard (or external sdcard, you know where your files are) » browse to the location where you saved the file and select the ROM file
      How to Flash File in CWM Recovery
  6. Now similarly flash the Gapps file.
    └ Make sure to first flash the ROM file and then the Gapps file.
  7. Reboot your device. For this, go back to the main menu of recovery and select reboot system now.
That’s all. Your phone will now reboot and it will take some time as it’ll be phone’s first boot after installing Android 4.4, be extremely excited for this!
Note: In case your device gets bootloop (stuck at logo while rebooting), just do a factory reset (step 3) and you will be fine.
GUIDE FOR TWRP RECOVERY USERS
  1. Boot into recovery mode. For this:
    • Power off your device and wait for 5-10 seconds until the device is fully switched off.
    • Press and hold  Volume Up + Home + Power buttons together and release them as soon as you see the Galaxy MEGA logo.
      └ In Recovery mode, use Volume buttons to navigate Up and Down between options and use Power button to select an option.
      For more options to boot into recovery mode, check our Galaxy Mega Recovery Mode page.
  2. Create a Nandroid Backup from recovery. It’s optional but very important to do, so that in case something goes wrong you can restore to current status easily. For making a Nandroid Backup, go to Backup » and select all check boxes and swipe on the Swipe to confirm option at the bottom of the screen to confirm backup.
  3. Perform a Factory Reset (this will delete all apps and their settings and game progress). For this:
    • Tap on Wipe » then at the bottom of the screen do a Swipe on the ‘Swipe to factory reset‘ option (screenshot)
  4. Also perform a ‘System format‘. For this:
    • Tap on Wipe » tap Advanced Wipe » tap System to select it » then at the bottom of the screen do a Swipe on the ‘Swipe to wipe‘ option
  5. First Install the ROM file:
    • Tap on Install » browse to the location where you saved the files and tap on the ROM file. Now at the bottom of the screen, do a swipe on the Swipe to confirm flash option to begin flashing.
      How to Flash File in CWM Recovery
  6. Now similarly flash the Gapps file.
    └ Make sure to first flash the ROM file and then the Gapps file.
  7. Reboot your device. Go back to the main menu of recovery and tap on Reboot » then, tap on System to reboot your phone.
That’s all. Your phone will now reboot and it will take some time as it’ll be phone’s first boot after installing Android 4.4, be extremely excited for this!
Note: In case your device gets bootloop (stuck at logo while rebooting), just do a factory reset (step 3) and you will be fine.

Saturday, 3 August 2013

Combine Drives/Partitions/Volumes in Windows | Without Third-party Software (Easy Guide)


When a hard disk drive needs an extra space to increase its size then it should be extended. The words Combine partitions means to extend a drive. This action will merge partitions and thus it will create a single drive. Windows 8/7/Vista has its built-in Disk management utility to resize partition safely and properly.  So you don't need to download any paid or free software to do this task.
You can also split a partition with the help of  the Disk Management.
Combine partition in Windows
If you are using Windows 7/vista or any beta version of Windows 8 you can follow the steps below. This tutorial will show how to extend a disk partition on a logical drive.

Combine Two Partitions:
Before starting the step-by-step process, suppose we are going to combine D: and E: partitions whose are not the system drive. And the size of the D: drive will be increased. These lines will help you for better understanding.

1. Open Control Panel and go to System and Security > Administrative Tools > Computer management. Or you can right-click on Computer and select Manage to get the Computer Management.
Computer Management of Windows
Computer Management


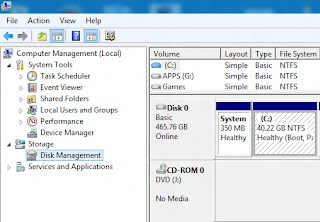
2. In the the Computer Management window, Expand the Storage from the left-pane and click on the Disk Management. Within a moment it will load all your drives.
Disk Management of Windows
Disk Management

3. Now you need a partition which will be added to the targeted one (E: drive will be added to D:). The drive which will be added to another, should be back-up before this major change on  disk partitions.

4. So back up, delete the partition (deleting the E: drive ).

Delete partition from disk management
Delete Partition

5. After getting a Free space partition, move to the partition (D: drive) which will be extended and right-click on it. Select the Extend Volume and go Next. It may look like following screenshot.
partition deleted
Deleted partition | Free space 

6. Here the selected drive and its size are given. Select next from the bottom right.
Select the Free disk space to combine
Select the Free disk space

7. This may take a moment to combine two partitions into a single drive.
After combining partitions
Combined partition

That's all. The size is increased and is able to manage your data like before.
Be with us for more fun at FacebookGoogle+ , Twitter or  Subscribe for free updates.

Change folder background in Windows 7/vista/xp [without software] hidden secrets


We like to customize folder and drive’s icon, color, view to give it a unique look. What about changing folder background? Usually we use software to do that. But here we’ll change the folder’s background without any software. To do so firstly we should know, what is the “desktop.ini” and how it works?


set background image
Folder Background
Desktop.ini is the file where system assigns the values of icon, info, background image source etc. The folder will gives info about itself or a thumbnail view which has the proper desktop.ini file. It is a hidden system file and it's possible to show by CASE: 2 step: 2 in this article. Nothing to worry about it because the system can automatically create a new one if the file is being damaged or absent. It just needs a reboot of the system.

Don’t like to read? Watch this video to change folder background.


Didn’t get a clear idea? Read the tutorial.

The following tutorial will show how to set an image as the background in a folder. This tutorial is divided into two CASEs according two different conditions.

CASE 1: Creating a desktop.ini file:

1. Go to the folder which background image will be changed.

2. Create a new text file and open to edit it.

3. Copy following two lines and paste them to the text file.

[AveFolder] 
IconArea_Image="C:\Users\user_name\my pictures\image.jpg" 

4. If you want a shadow effect for text give ShadowedText=1 and for applying same image to all sub directories give Recursive=1 like this.

[AveFolder]
IconArea_Image="C:\Users\user_name\my pictures\image.jpg"
ShadowedText=1
Recursive=1

Untitled
ShadowText & Recursive

5. After creating, save the text file then rename it to desktop.ini and restart your PC.

The “IconArea_Image=” (CASE: 1 step 3) describes the source path of the background-Image. You should not select an image source path from removal disk. If you are setting up the image of your removal drive then your background-image source should describe a path of that drive.

Sometimes a message could come showing replacement of desktop.ini file. That means your working folder already has same file. It is better to cancel the replacement of this file and follow the CASE: 2.

CASE 2: Editing desktop.ini: 1. Go to Folder Option from Control panel or from explorer’s menu bar>folder option.

Folder Option Windows
Folder Option from Control Panel

Folder option (2) Windows
Folder option from Explorer menu bar

2. Select view tab and scroll down to find out hide protected operating system file and uncheck it. It is important to mark Show hidden files, folders and drives first from this view tab.

un hide protected file of OS
Folder Option>View tab

3. Find out the desktop.ini in the current directory and open it with a text editor, like: notepad.

Hidden files folders on Windows
Hidden desktop.ini


4. Paste the lines described in CASE: 1 step: 3, just after the [.ShellClassInfo]’s description lines.
shell class info and ave folder
[.ShellClassInfo] & [AveFolder]


5. Save and exit from desktop.ini
6. Restart your PC to take an effect on OS

Hide or Unhide Hard Disk Partition in Windows 7/Vista/xp with simple steps


Hiding a partition or volume from my computer or explorer is preventing that partition from displaying, but it doesn't mean erasing any data or deleting the volumeWindows OS Disk management system allows hiding drives except the System drive where the OS is installed and the System reserved volume. So, anyone who has administrative privilege or the administrator of the Windows machine can do this task. And the basic trick is, without any drive letter (Ex: C:, D:, E: etc.) Windows OS doesn't recognize any drive or partition and here we are going to remove that letter temporally.


To do this task you need administrator privilege. So, why don't you activate the administrator account and use it.

How to hide a drive: 
     1. Click right mouse on the computer and select Manage. Select the disk management under storage from the left pane. Or, you can also get the Disk management typing diskmgmt.msc in the run and pressing enter.
Disk Management

     2. From there click right-mouse on which drive you want to hide and select Change DriveLetters and Paths.
Change Drive Letter or Path

     3. Now select remove. Don’t worry! This action just removes the drive letter.
Remove drive

     4. Pressing on the Remove a warning message will be shown and accept it by clicking on yes. It’s just telling you that all programs installed on that drive won’t work or this drive is opened by another program.
Warning Message 

It’s done! Your selected drive is hidden now.

The hidden drive won’t be appearing to the administrator of the OS unless it is unbidden.

How to unhide the drive: 
    1. Open the Disk Management as shown above.

    2. Right mouse click on the drive which is hidden/removed. Tips: the hidden drive doesn’t contain any drive letter.

    3. Choose the Change Drive Letters and Paths and select Add to add drive letter or path to the hidden drive.
Add hidden drive

Assign drive letter

     4. At last choose a drive letter to assign the drive/partition and press on OK. Wow! The hidden partition is displayed in an explorer or my computer.

That's it! No data is lost or damage. Even the installed files are working again without any errors. From now you shouldn't need any extra software to hide or unhide your PC's drives. And if it helps you, why don't you share or rate this?

Recovering Folders Showing as Shortcuts, Hidden in USB/Memory-Card/HDD,


By connecting flash drives to the affected computer, often it shows flash drive containing just some folder's shortcuts. Sometimes it shows nothing though drive's properties show it has files in it. Even we get some inaccessible folder or file. This type of problem may also seen in our local drives (HDD partitions). Even paid anti-virus is unable to resolve those folders, they just scan and detect The AUTORUN worm which one will execute all programs. Then our important files remain hidden.
hidden folders shortcuts
Hidden folders and Shortcuts by the Autorun Worm


Here we will see how can we solve this problem by using command line and batch file. Though the batch file is nothing but the executable file contains command lines. So solving the hidden and shortcut problem of USB or drives, we must have the administrator privilege as we will execute something.

Using Command line:

To solve/fix the folder's hidden or system file, the easiest way is to run a command line. You canapply this command to USB and local drive as well, need to change the drive_letter.

Go to Run, type cmd and hit enter. In command prompt just type:

attrib -h -s -r -a /s /d drive_letter:\*.* 

And hit enter. Be sure you've typed the drive letter (e.g. j:,h: or D:) instead of "drive_letter" in the command line. My USB drive letter is J: and my command should looks like:
Command to change files attributs
Command for unhide system-hidden files on a drive

All files and folders will be normal and you should be able to delete the shortcuts, created by the virus.
Command line details: Here atrib=attribute, "-"=remove attribute/permits, h=hidden s=system, r=read-only, a=archive, /s=sub directory, /d=directory, drive_letter=the letter of the drive shown in windows explorer (e.g. j:,h: or D:) and *.* is called the wild card for all files.
If you don't like to be a "command Ninja" then see below.

USB, MicroSD, MiniSD or other Mmory Cards issue:

     1. Connect your USB or memory card to the PC or laptop.

     2. Copy these lines and paste it into a "new text file"

@echo off
attrib -h -s -r -a /s /d drive_letter:\*.*

3. In the 3rd line give the drive letter name (Example: J or K or L etc.) instead of "drive_name"

4. Save the text file as any_name.bat

5. Double click on the any_name.bat file and it will run in the command prompt and see the hidden files/folders come back.

6. Delete the shortcuts and unnecessary files and folders from USB drive.

Local drive issue:

1. Copy these lines and paste it into a "new text file"

@echo off 
attrib -h -s -r -a /s /d D:\*.*
attrib -h -s -r -a /s /d E:\*.*
attrib -h -s -r -a /s /d F:\*.*
attrib -h -s -r -a /s /d G:\*.*
attrib -h -s -r -a /s /d H:\*.*
attrib -h -s -r -a /s /d I:\*.*
attrib -h -s -r -a /s /d J:\*.*
@echo complete.

2. Save the text file as a bat file (example: any_name.bat)

3. Run this bat file by double-clicking on it.

Thus you can solve this kind of problems with a *.bat file. You can save the *.bat file for solving this hidden problem.

Important: These tutorials are applied for Windows 7/Vista/xp. You must have the administrative privilege to run the command or execute the .bat file. Put the " : " after the j, k, or D (drive letters). These commands are not case sensitive.

Easy to Apply Same Folder View to All Folders in Windows


In Windows, you can choose the behavior of folders how they will look and work to suit your needs. Different user likes different folder views or layout and for this reason Windows has eight different views or layout for folders. The available views are Extra large icon, Large icon, Medium icon,Small icon , Lists , Details, tiles or a Content found in the layout. You can choose one and want to apply it to ll over the directories or sub-directories. If you set the folder view settings manually, It'll be very hard and time wasting task to go each folder and apply the changes. Yes, Windows OS has  option to get the same view to all folders. So user can choose a view and able to apply it to all others folders and sub-folders as well.


These simple steps will show you how to apply the same folder settings all over the system except some 'special folder' in Libraries and Favorites.

Apply Same Folder View to All Drives and Folders:


     1. Open the Explorer or Computer and open  a drive.

     2. Make the changes for the folder from the top right corner or Layout pane. Which is located in the top right corner in the Windows 7/Vista and View section in Windows 8
Windows 8 folder layout
Layout section under View

Windows 7 folder layout
Layout section  Windows 7

     3. After making changes
          a. Windows 8: Click on View from the explorer ribbon and click on the Options. The Folder Options will pop-up.
View tab and Options in Windows 8
View tab and Options Windows 8

          b. Windows 7/Vista/XP: Go to the Tools (using ) from the menu bar > Folder option and select the View tab. The Folder Option will pop-up.
Tools and Folder Options in Windows 7
Tools and Folder Options Windows 7

If your menu bar is not visible then click on Organize from the toolbar and select the Layout and tick on the Menu bar.

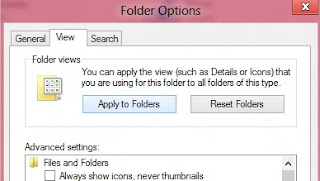
     4. From the View tab click on the Apply to Folders and all directories or sub-directories of all drives or folders will get the same view as the current one.
Folder Options window
Apply to Folders
     5. If you want to apply some changes to the sub-directories just open any folder after entering a drive. Now follow the step 3 and 4.

Back To Default: Use the Reset Folders tab, available on Folder Option window, to revert at the default settings of the OS.

That's all! Apply it and make your working ground more comfortable with a easy look

Monday, 15 July 2013

Update Galaxy Note 2 to Hawkish Jelly Bean 4.1 Custom ROM FREE

                                             The Hawkish ROM, which is extremely popular among Galaxy S I9000, S2 and even S3 users, is now available for theSamsung Galaxy Note 2 handsets, so during the present tutorial we will be checking in how to install this Jelly Bean 4.1 based custom ROM on the mentioned phablet. I know that the Galaxy Note 2 is one of the most powerful Android based devices nowadays, but as you will see below, the Hawkish software comes with many features and capabilities that will customize and optimize your handset’s internal system, so that you will be able to receive even more power from your high end smartphone.
The update is being provided by those of xda-developers (the developer zohawkish is the one who had developed and tested the firmware for the Galaxy Note 2 so we have him to thanks) and as it is a custom ROM, the platform has nothing to do with Samsung. Furthermore, even if the Hawkish software is being based on the stock ZSALJA Android 4.1 Jelly Bean firmware, you will not get the default Android platform; your device will be updated with a custom ROM that has a custom interface and extra features that comes to improve the classic Android OS.
So, in order to conclude, once you flash this upgrade on your Note 2 you will be able to experience a new Android system, an improved one. Also, you will notice that many features, extra ones, are being installed and that the performances of your phablet were customized and optimized. Anyway, the best way from which you can make a proper idea about the Hawkish Jelly Bean 4.1 custom ROM is by taking a look over the image from below. I have listed there all the capabilities and features that will be added on your Galaxy Note 2. The list is long, but this is something that should make you decide to complete this step by step guide.
Galaxy Note 2 Hawkish Jelly Bean Features
Now that we know what the Hawkish firmware is capable of, let’s talk about the pre requisites. Yes, some preparation tasks are being required, or else you will not be able to apply the below steps that will take you through the installation operation. For easing your work I have detailed the pre requisites during a list, so you can easily take a look over the same. Before that, just backup the data of your Note 2. A backup must be performed before any complex procedure and the present one implies the same. If you don’t know how to make a proper backup, use our search engine and apply our backup and restore tutorials.
  • You must begin by rooting your Samsung Galaxy Note 2. A custom update can be installed only on a rooted system.
  • The warranty will get void, therefore be careful in what you do and try not to mess things up.
  • If you will need to, you can restore the warranty and reset the flash counter by downgrading to the stock ROM, or by updating with an official update when available. Then, the root access will be revoked and the bootloader relocked.
  • Once the OS is rooted, install a custom recovery image on your Galaxy Note2. CWM recovery should be what you need. This tool will be used for the flashing procedure, so the Jelly Bean update cannot be applied without using CWM recovery.
  • Remember to backup the data as a wipe of the system will have to be performed.
  • You need to use a computer, the phablet and its USB cord.
  • On the computer you will download the update file, so internet connection must be enabled.
  • On the handset, enable the USB debugging option.
  • On the computer and device deactivate the antivirus tools and the Firewall protection.
  • If your smartphone has less than 50% battery power left, first go and charge its battery, or else it might get turned off in the middle of the operation.
  • This tutorial is being suitable only for the Samsung Galaxy Note 2, so don’t try to update other devices with this Hawkish Jelly Bean 4.1 software.

How to Update.

  1. You can get the ROM file from here; save it to the computer.
  2. Then, use the Galaxy Note 2 USB cable and connect the phablet with the PC.
  3. Copy the downloaded file from the PC to your handset. Do not extract the file.
  4. Next, remove the USB cord.
  5. We are done with the computer.
  6. Turn off the device.
  7. And reboot to recovery mode menu.
  8. You can do this by pressing and holding the Volume Up, Home and the Power buttons together.
  9. The recovery menu will now be displayed on your Note 2.
  10. From there, you must first select “wipe data factory reset” and “wipe cache partition”.
  11. Then, return by selecting “+++go back+++”.
  12. Select “install zip from sd card” and “choose zip from sd card”.
  13. Take the update file which you have placed on your handset just a few minutes ago.
  14. Flash the same and wait as the process should take a couple of minutes.
  15. In the end, from recovery select “+++go back+++” and “reboot system now”.
Congratulations, your Samsung Galaxy Note 2 is running the Hawkish Jelly Bean 4.1 custom ROM firmware. The update process is now over so you can safely use your phablet once more. Take your time and test the ROM, see how it performs and then return here and share your thoughts with us. Don’t forget to tell how the update operation worked, or if there were issues while trying to install the software on your Note 2. If so, we will try do come with the best solutions for you.